Required profile: rental manager for the reference data, service charge manager for the keys (Configuration menu).
Step 1 · View the portfolio
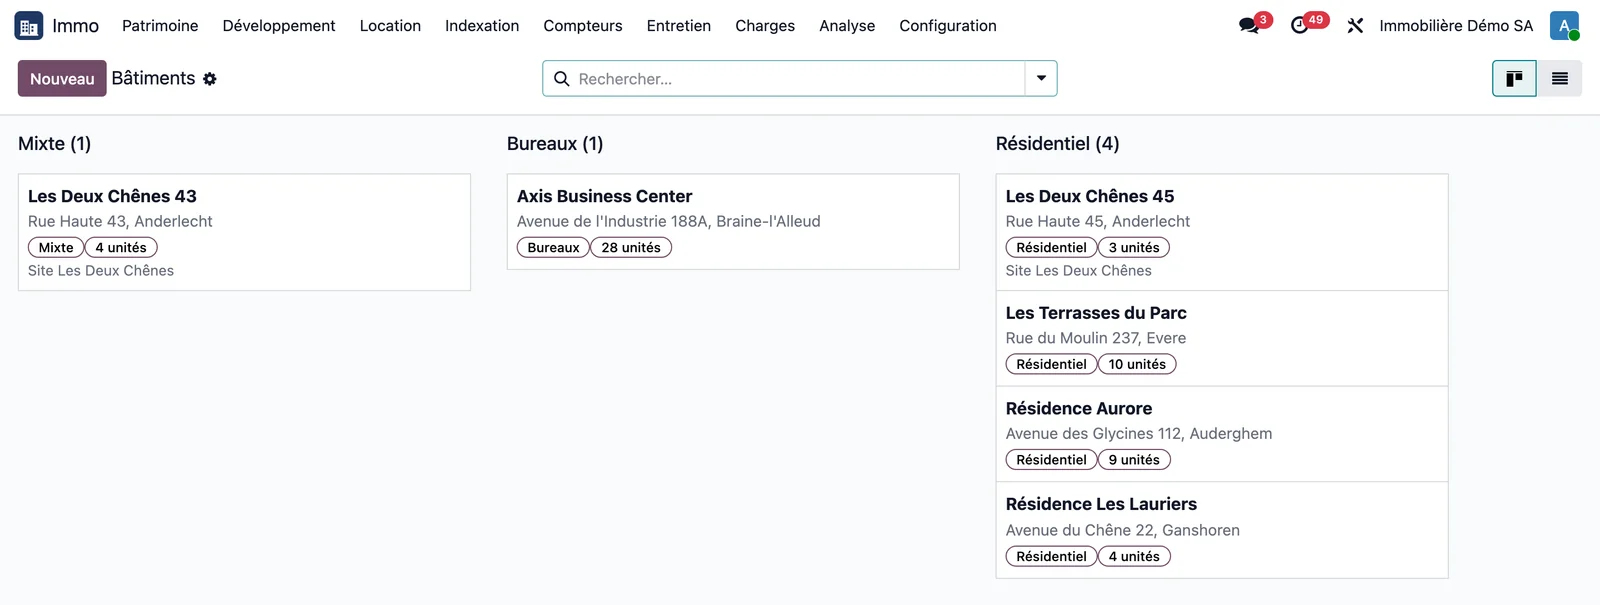
Open Immo > Portfolio > Buildings. The kanban view groups buildings by use (mixed, offices, residential). Each card shows the address, the use, the number of units and, where applicable, the site the building belongs to. In a multi-company setup, a building whose property management company differs from the owning company also carries the label “Delegated management”.
Step 2 · Read a building record
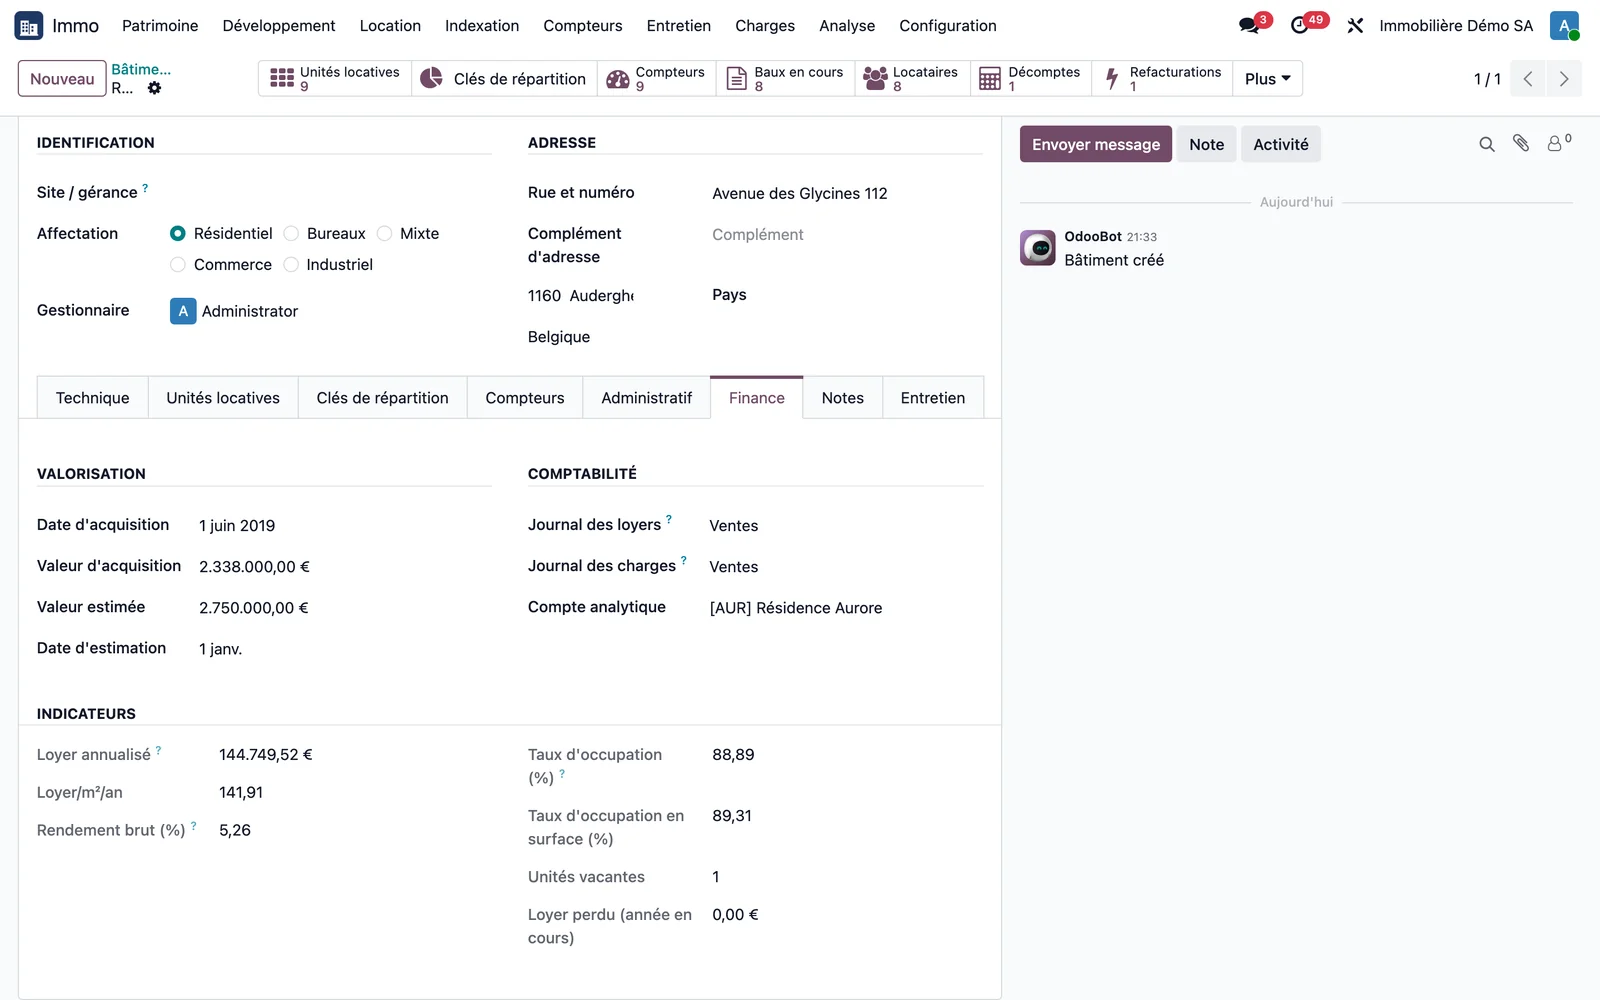
Open a building, for example “Résidence Aurore” in the demonstration. At the top, the buttons open the building's rental units, allocation keys, meters, current leases, tenants, statements and recharging; the More menu gives access to the others, including rent trends and profitability. The Finance tab holds the valuation and the Indicators block, calculated live: annualised rent, rent per m² per year, gross yield, occupancy rate (in units and in floor area), vacant units and rent lost in the current year.
Step 3 · Group buildings into a site
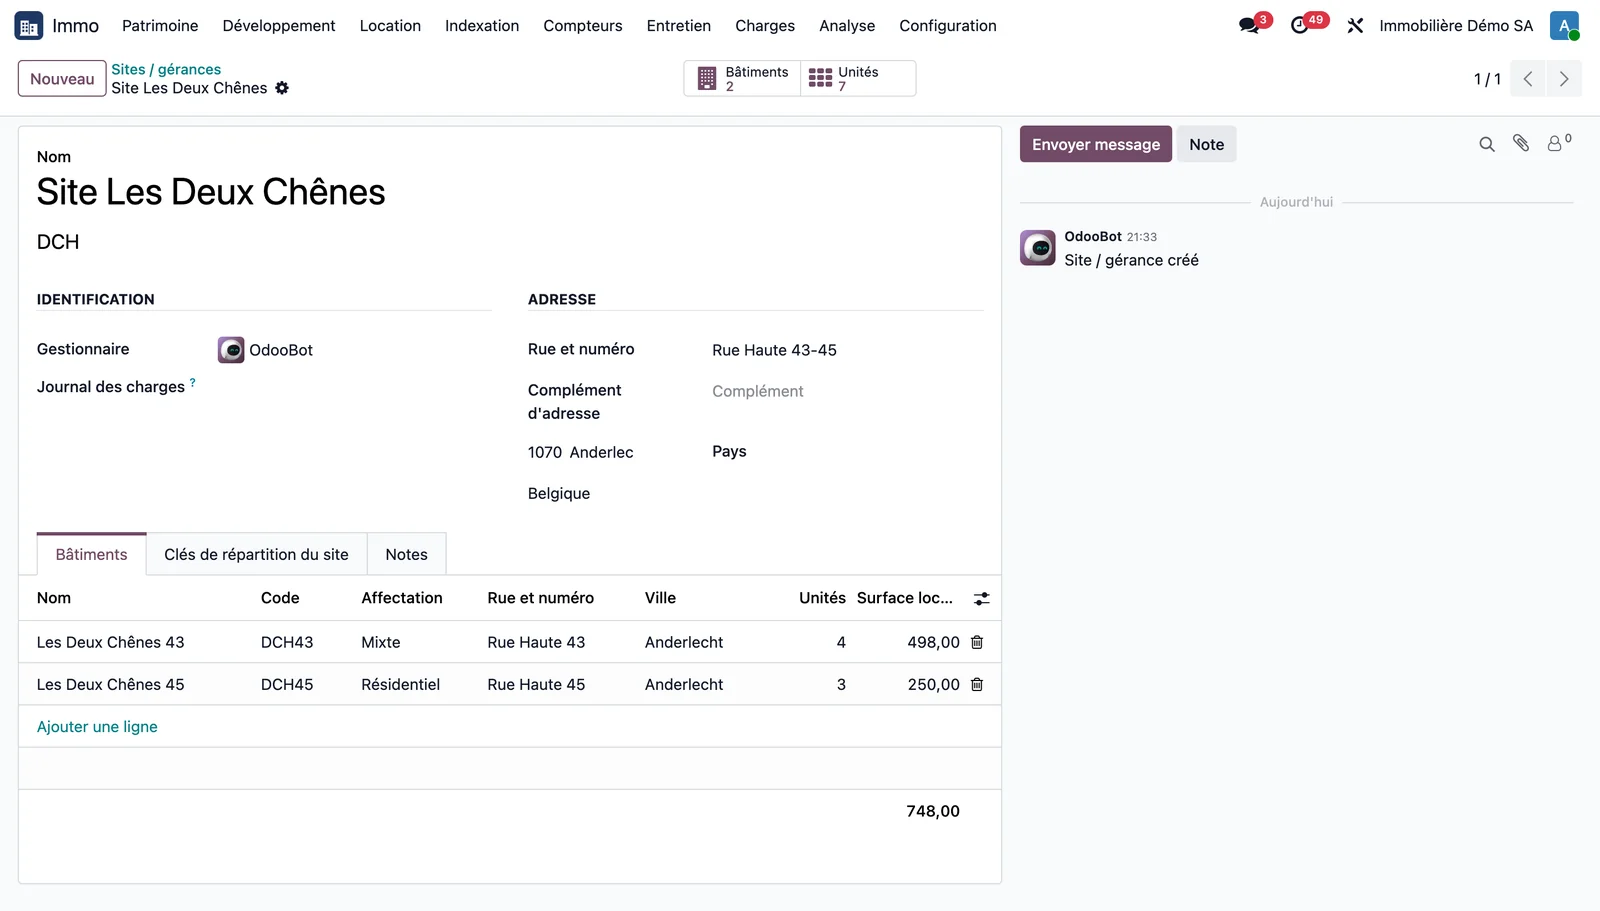
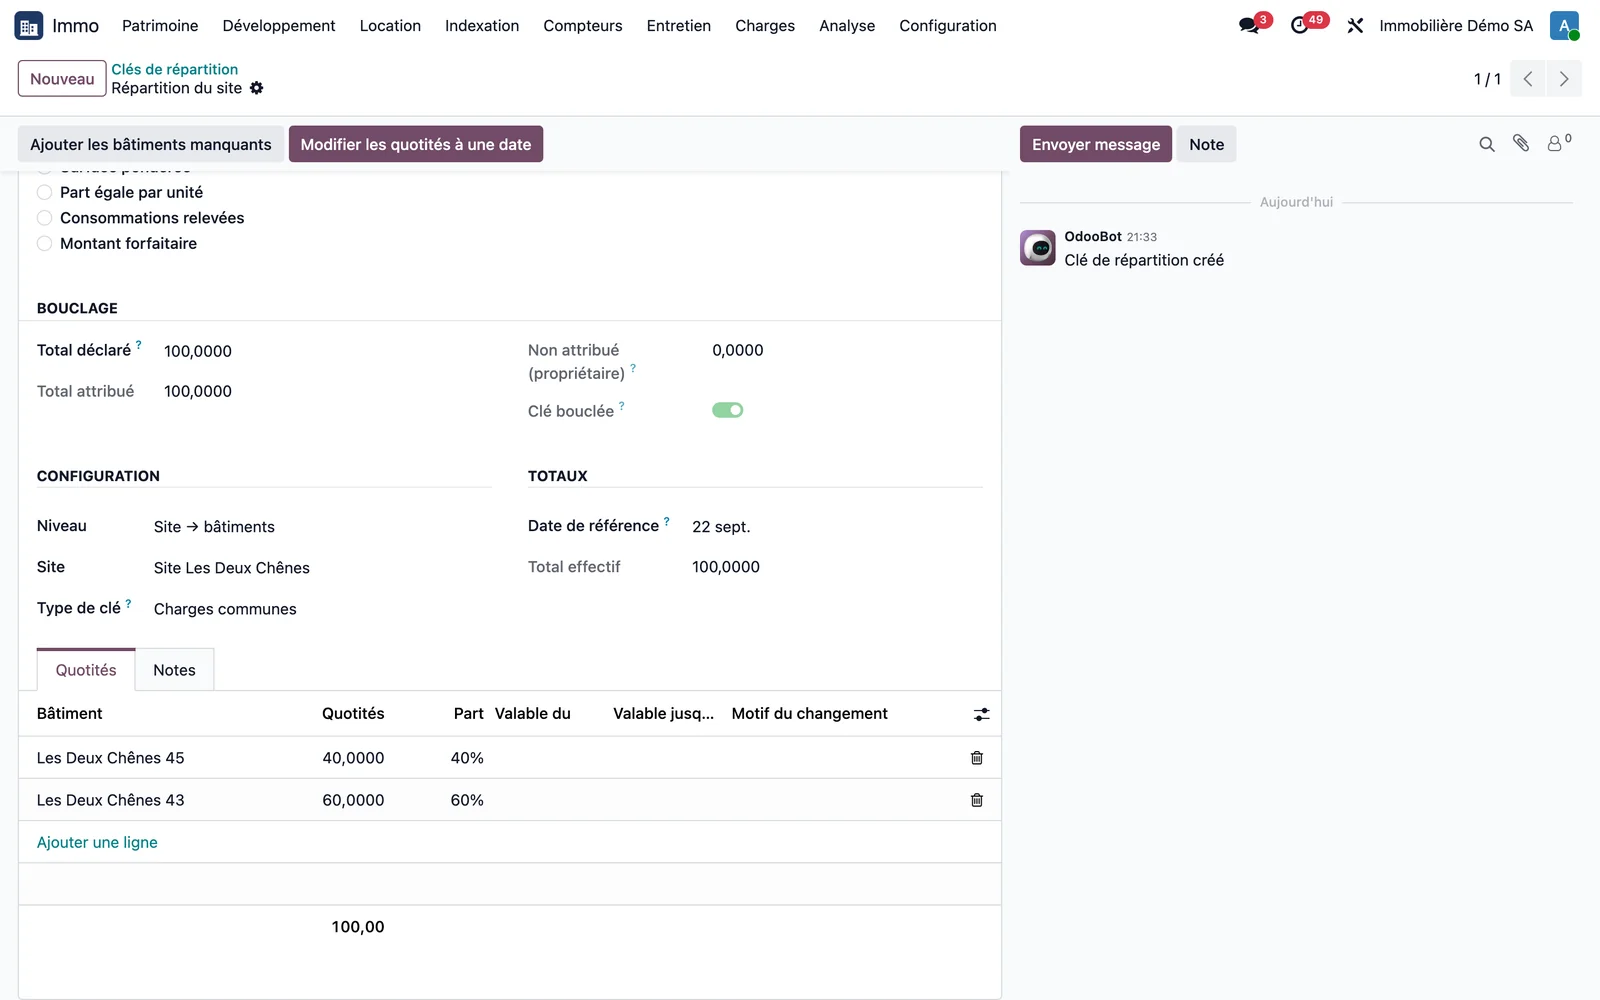
When two buildings share service charges, open Immo > Portfolio > Sites / property management and link them to the same site. Each building's share is set in a site-level key (Site allocation keys tab), in shares or as a fixed amount. In the demonstration, “Site Les Deux Chênes” groups Les Deux Chênes 43 and 45, and its “Site allocation” key splits the service charges 60 and 40.
Step 4 · Create an allocation key
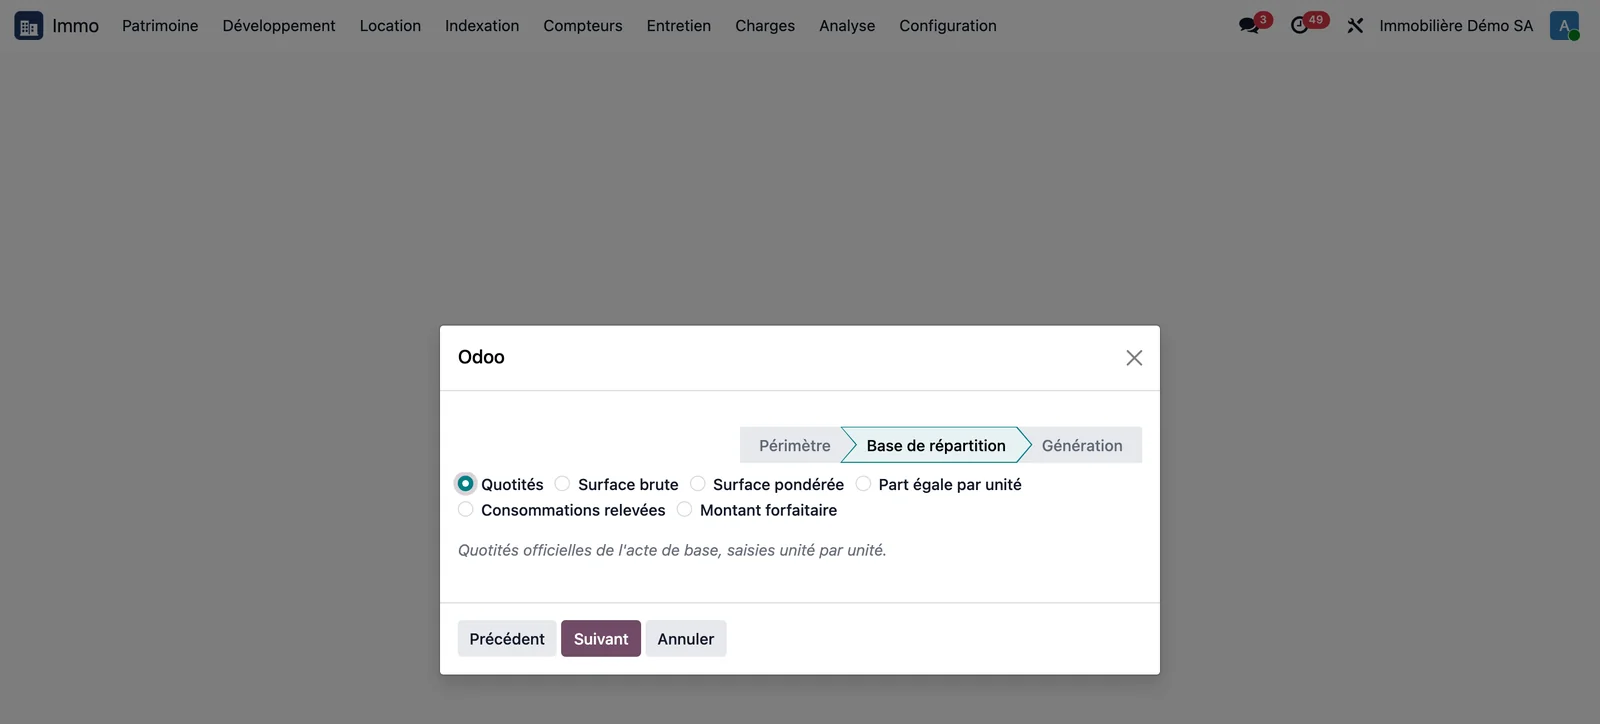
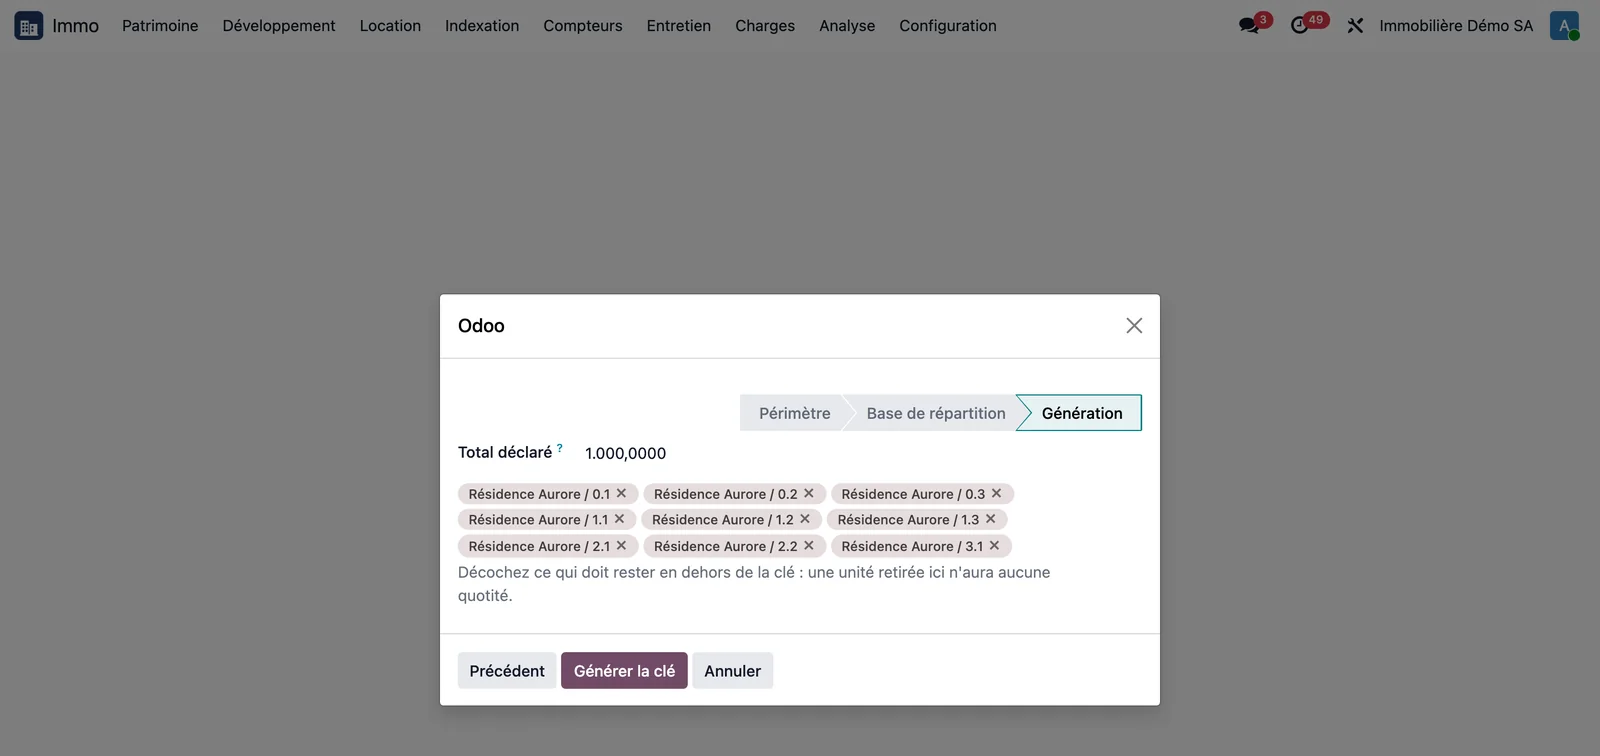
Open Immo > Configuration > New allocation key. The wizard has three screens. Scope: the level (building to units, or site to buildings), the building, the name and the type of key. Allocation basis: shares, gross area, weighted area, equal share per unit, metered consumption or a fixed amount. Generation: the building's units are proposed as tags; remove those that do not take part in this service charge. For the area and equal share bases, the declared total and the shares are calculated automatically.
Step 5 · Check the building's keys
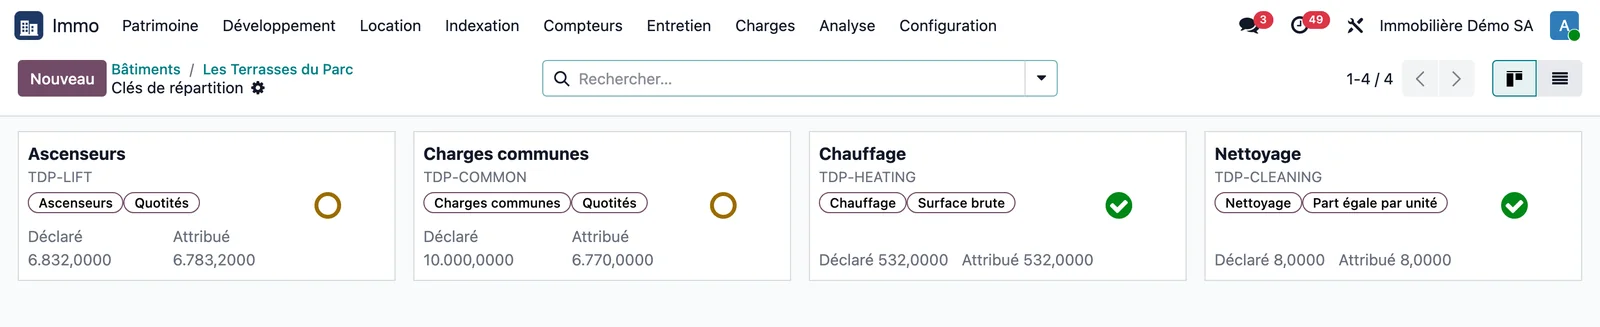
From the building, the Allocation keys button opens their kanban view. Each card shows the service charge type, the basis, the declared total and the allocated total. The icon shows the status of the key: red triangle for over-allocation, green tick if the key is fully allocated, orange circle if a share is left with the owner.
Step 6 · Read the shares of a key
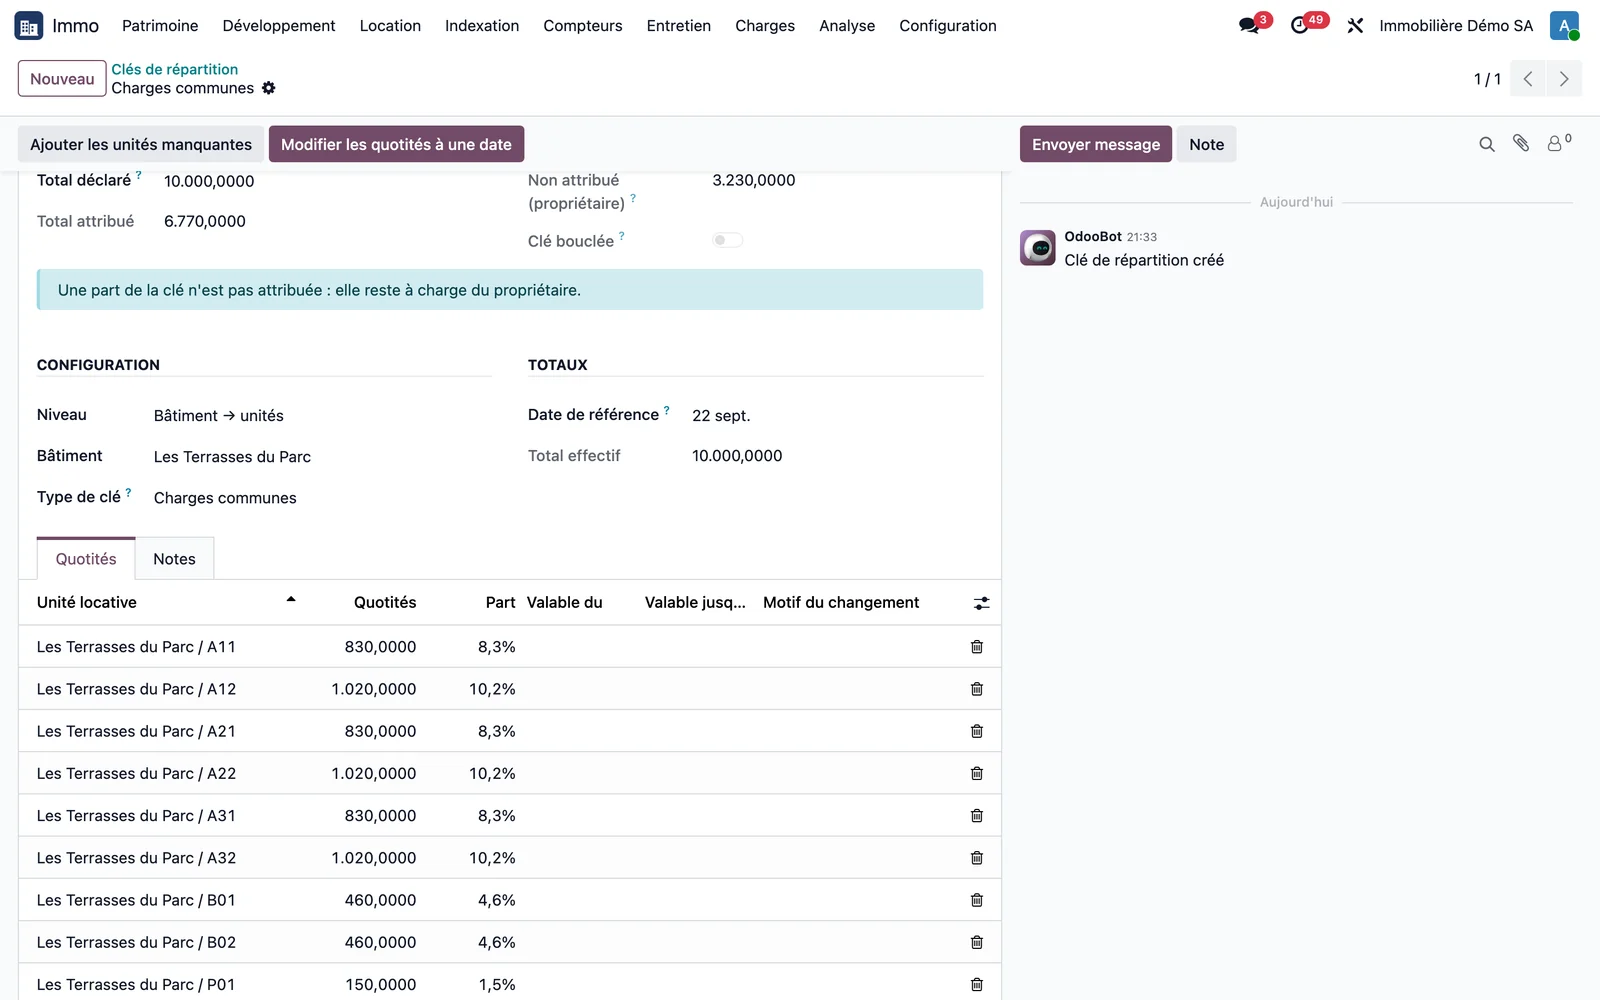
Open a key. The Balancing block compares the declared total with the allocated total, and shows the unallocated amount (owner's share) and the “Key fully allocated” indicator. The Shares tab shows, for each unit, the share, the percentage, the validity dates and the reason for the change; these last three columns are filled in as soon as a share has been changed on a given date.
Step 7 · Change a share on an effective date
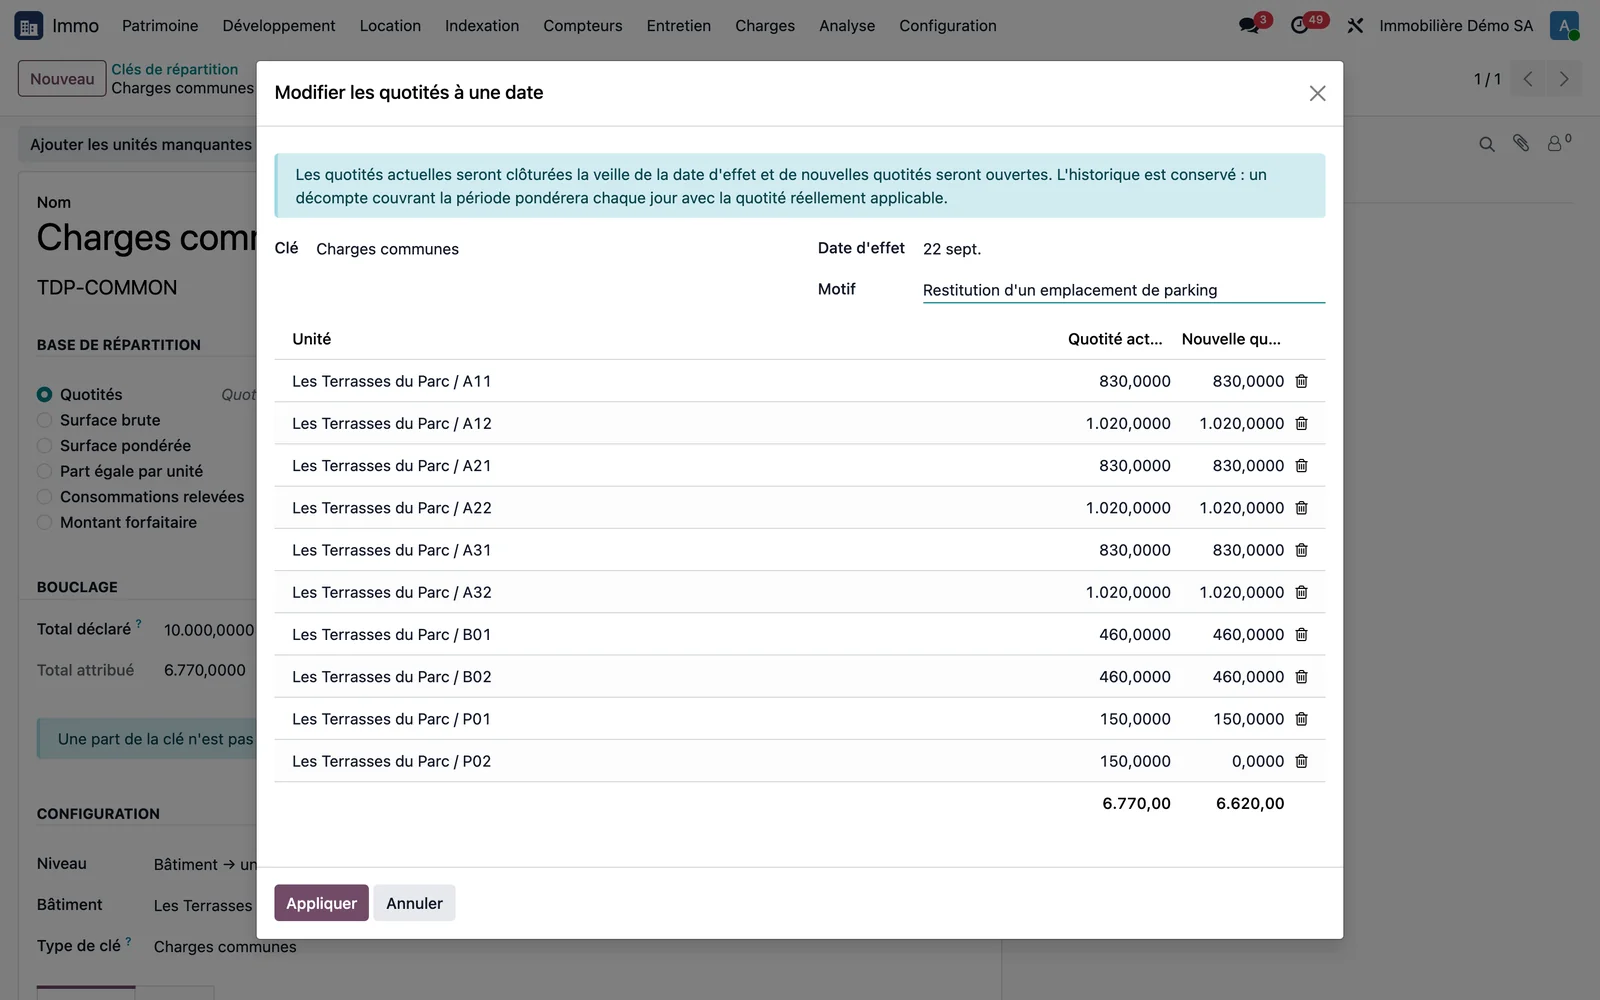
On the key record, click Change shares on a date. Enter the effective date, the reason and the new values next to the current shares; the two totals update. When you confirm with Apply, the old line is closed the day before and the new one opens on the date. A statement covering the period weights each day with the share that applies.
Step 8 · Insurance and claims
From a building, open the list of its insurance policies: insurer, buildings covered, next renewal date and status. A policy record shows its scope, the contract (insurer, broker, dates, tacit renewal), the amounts (insured value, premium, excess) and one line per cover with limit, excess and exclusions.
The comparison tool places two or more policies in columns and the covers in rows: a missing cover appears in red, “Not covered”. From a tenant's ticket, the Report a claim button opens a claim already linked to the building, the unit, the lease and the policy, with the excess of the relevant cover filled in automatically. Sixty days before a policy's renewal date, an activity alerts the property manager.
Step 9 · Publish a listing
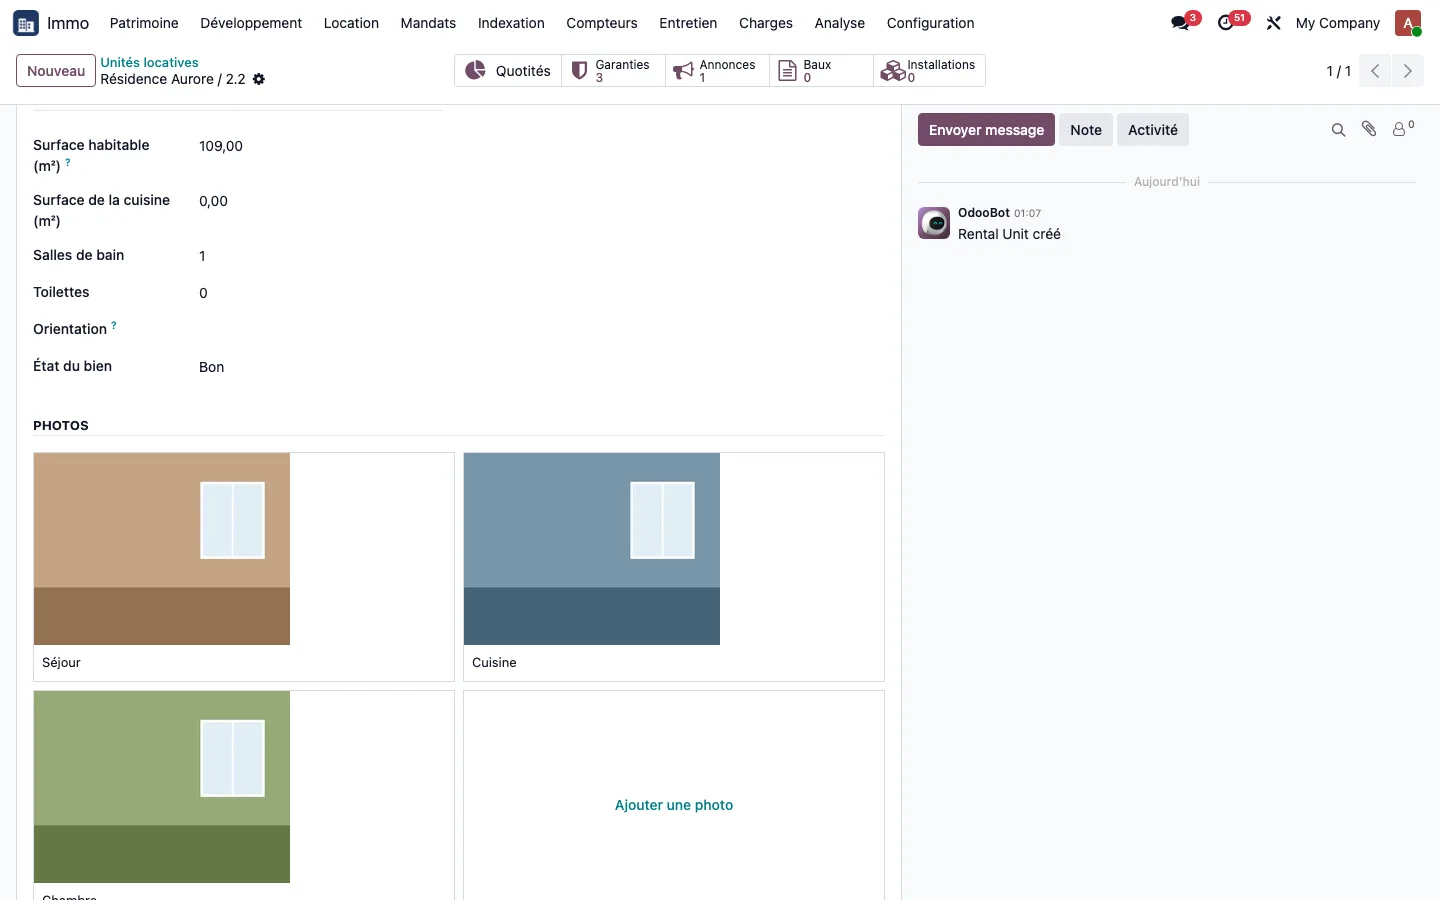
Open the rental unit, Listing tab: enter the publication criteria (living area, kitchen, bathrooms, orientation, condition of the property) and the photos in order, each with its caption. The Listings button at the top opens the listings already created for the unit.
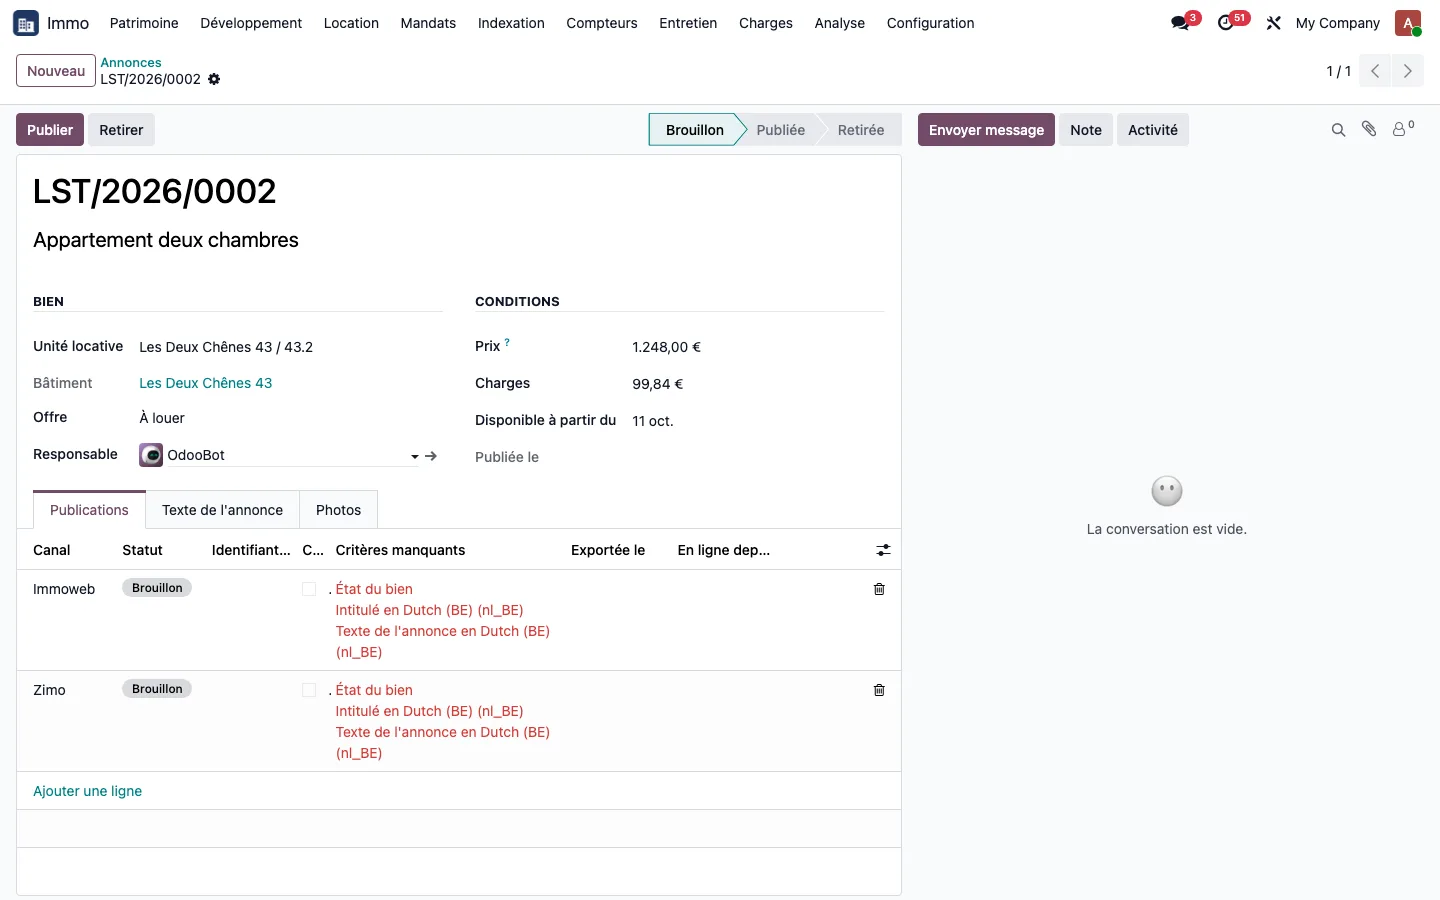
On the listing record, open the Publications tab: one line per target channel (Immoweb, Zimo, ImmoProp), and the Missing criteria column shows what still needs to be completed. The Publish button is refused as long as a criterion is missing for a channel.
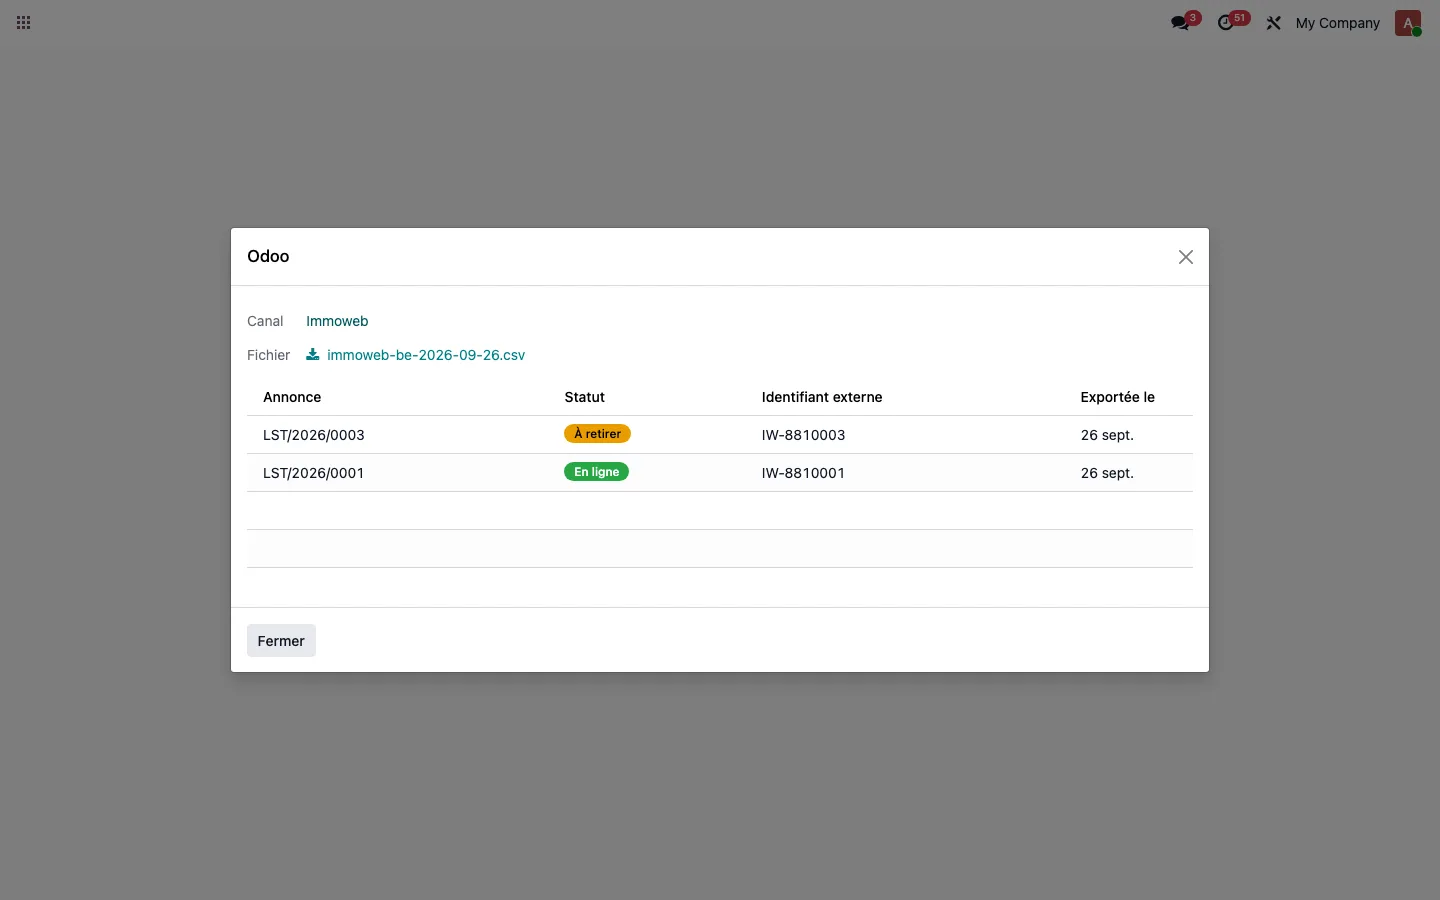
The setup of each channel (required languages, minimum number of photos, criteria and value mappings) is configured in Immo > Configuration > Listing channels. From Immo > Portfolio > Listings > Export to platform, choose the channel: the wizard produces the file to send. Signing a lease on the unit withdraws the letting listing automatically; a publication that is already online moves to To withdraw until the platform has been notified. Exchanges with the platforms are file-based, with no direct connection: see the full presentation on the Listing publication page.
Step 10 · Set up a building
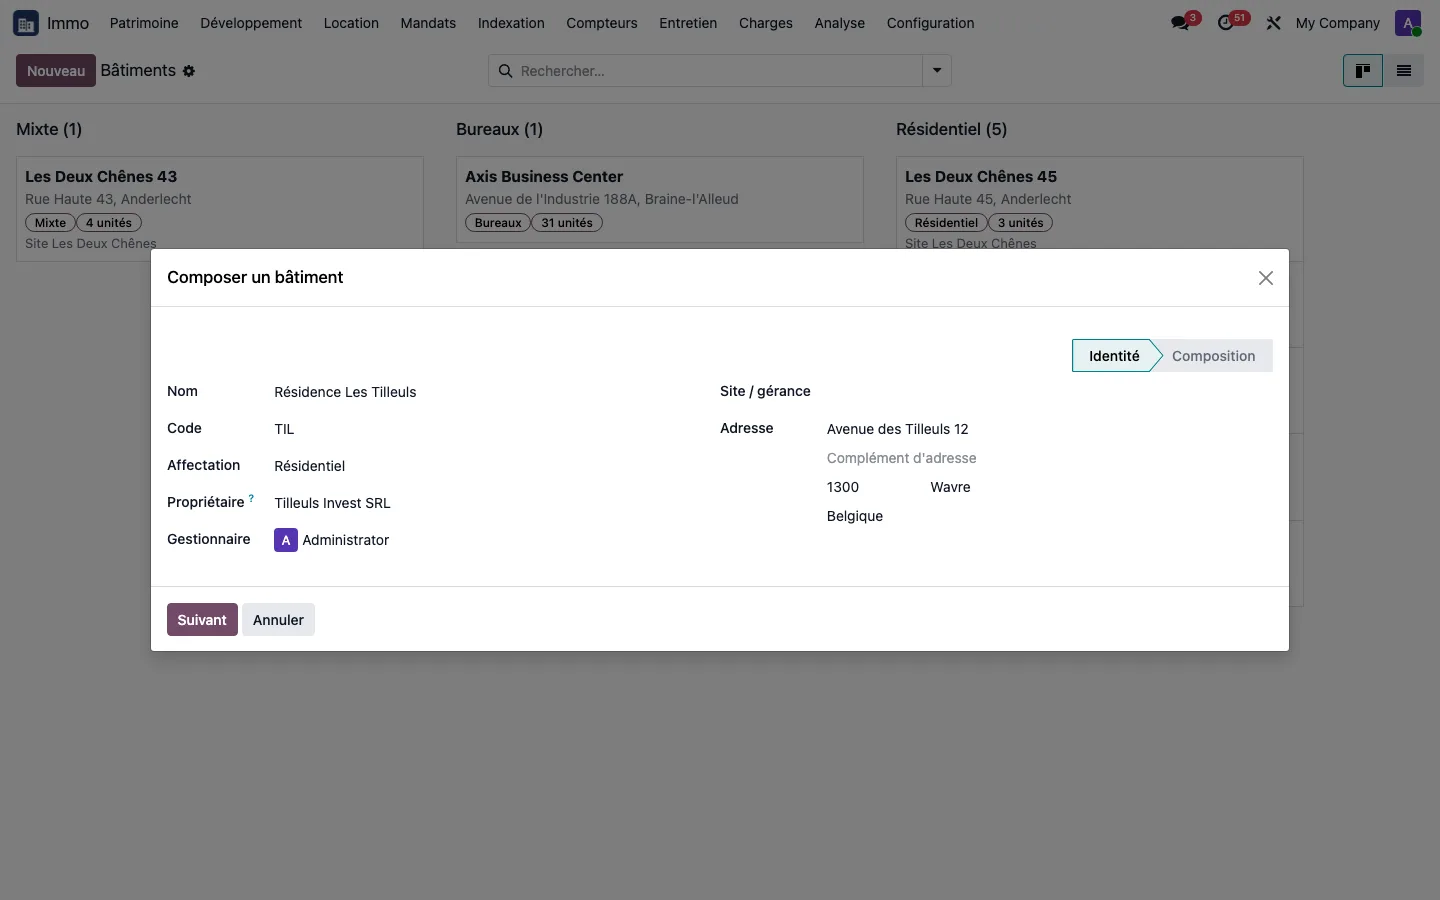
Open Immo > Portfolio > New building (wizard), or the Set up a building button in the list of buildings. The first screen holds the name, code, use, owner, property manager, site and address.
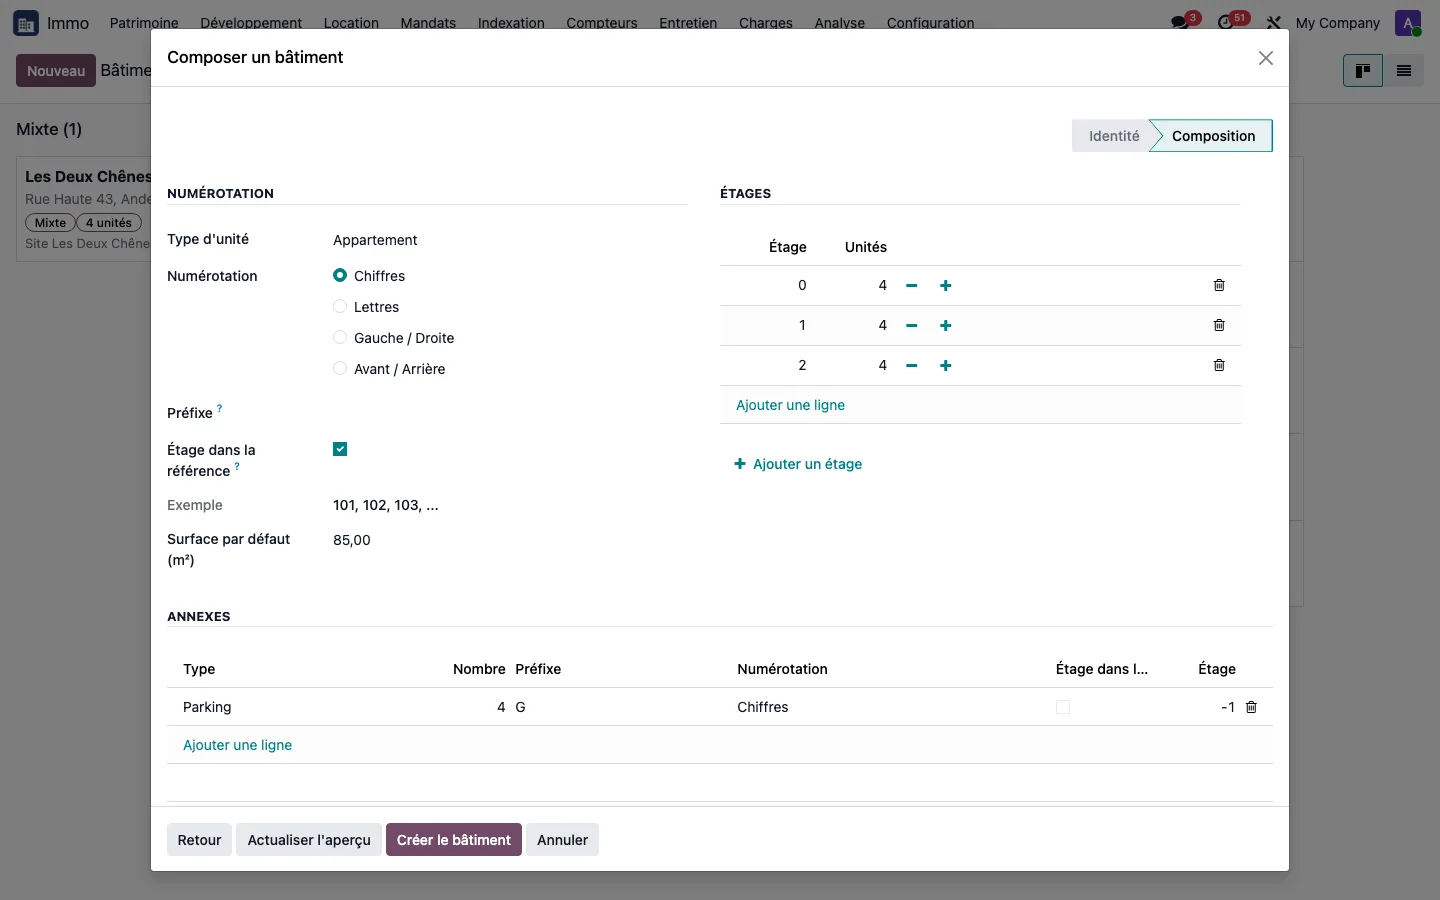
Next moves on to the layout: four numbering schemes to choose from (digits, letters, left and right, front and back), an optional prefix, one floor per line with buttons to add or remove a unit, and a block to add garages.
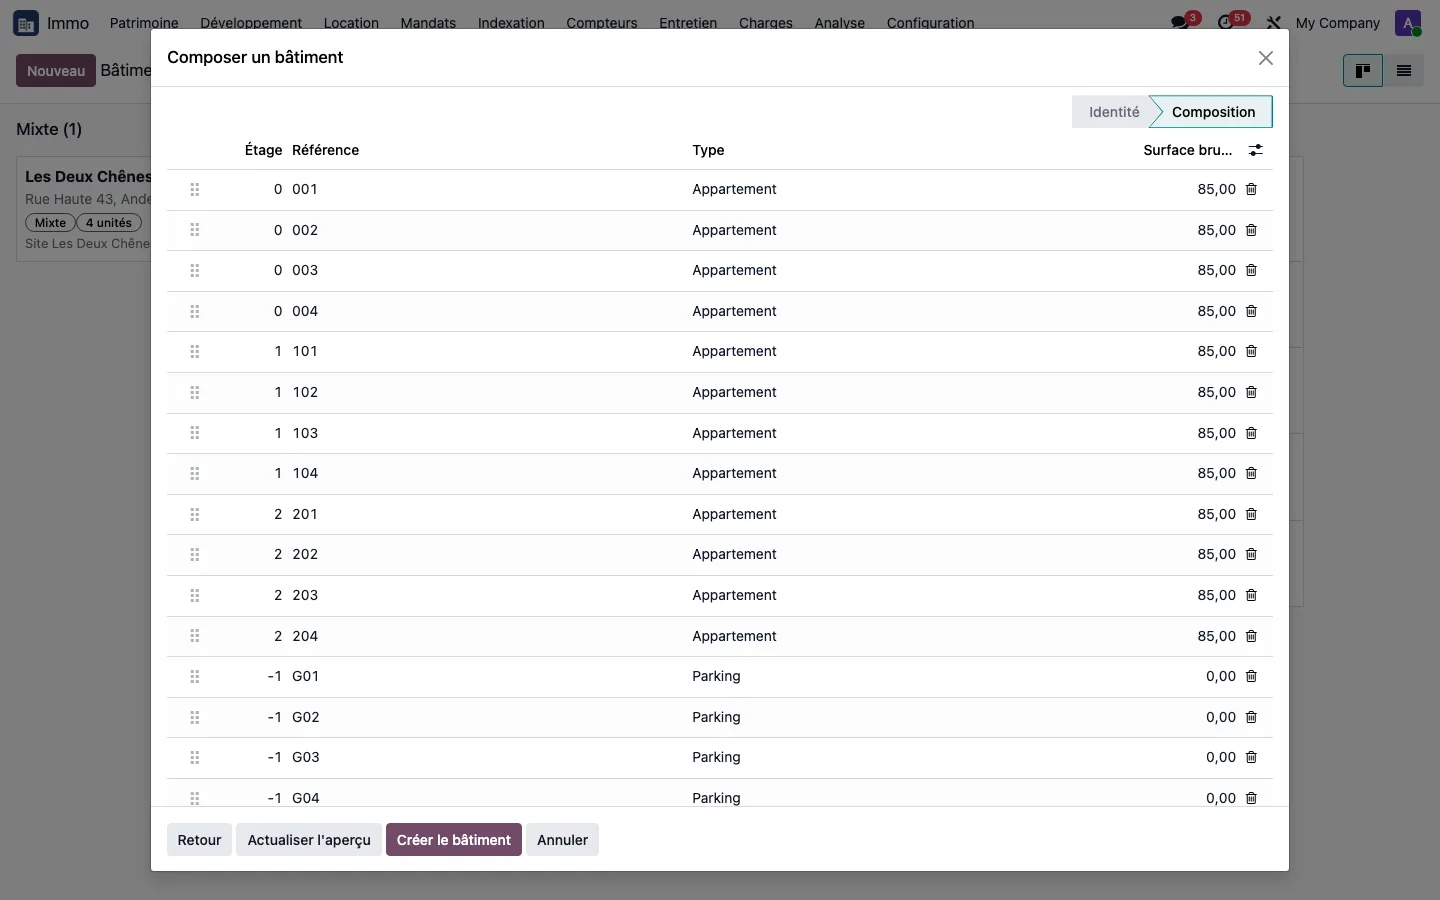
Refresh preview calculates the units without creating anything: each line can be corrected, moved or deleted before creation. An outdated preview (layout changed since the last calculation) blocks creation until it is refreshed, with a message saying what to do.
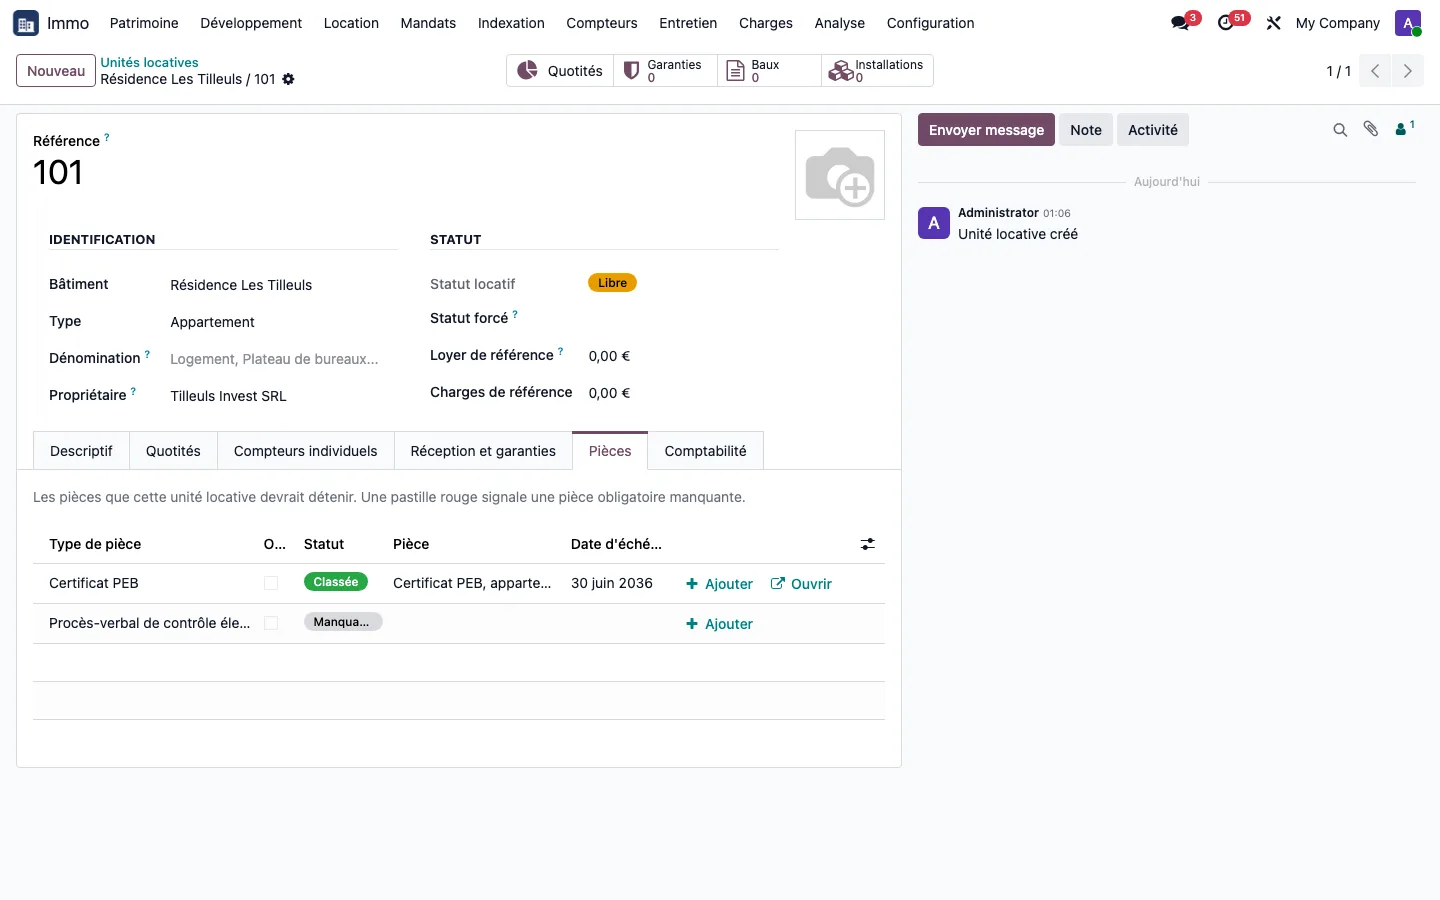
Create the building opens the record created: the building, numbering rules and units all carry the same creation date, in a single operation. Documents tab of the building or unit record: one line per expected document type (deed of purchase, EPC, insurance policy, electrical inspection), its status (filed, expired, missing) and a button to add it.
A let unit can move to For sale from the forced status without losing its lease, its tenant or its occupancy: see property statuses on the Leases page. The Let filter keeps it in the list, with its For sale badge.
Step 11 · Set the handover and warranties
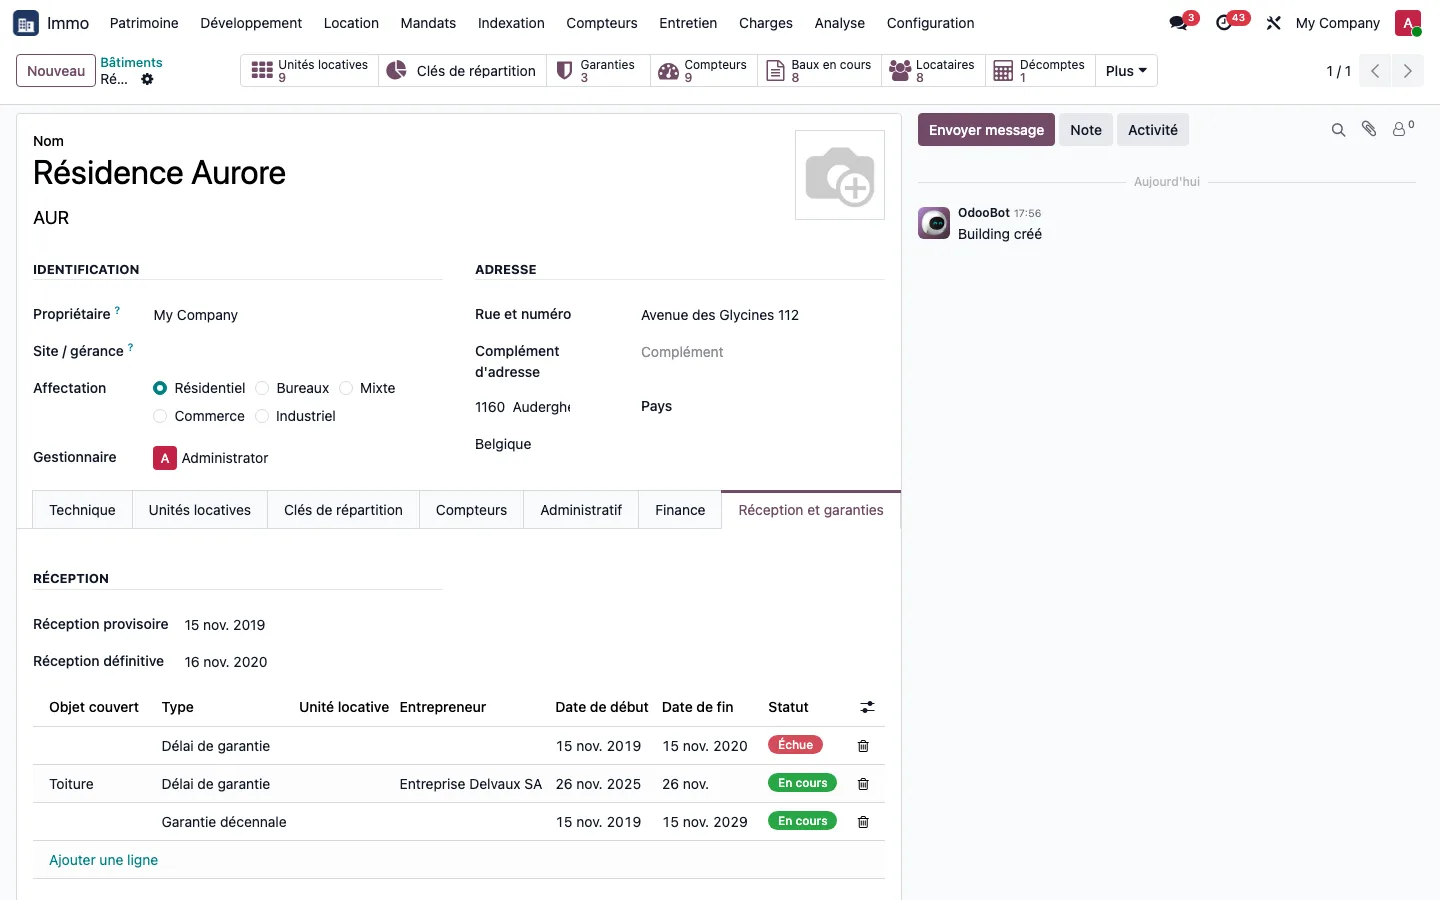
Open a building record, Handover and warranties tab. Enter the dates of provisional and final handover, then add the warranties: defects liability period, ten-year warranty, proper functioning, or a specific element such as a renewed roof, with the contractor. Each type provides its duration and its starting point; the end date is calculated automatically and can be edited. A manually entered date holds if the handover changes, and changing the duration of a type does not rewrite any existing warranty.
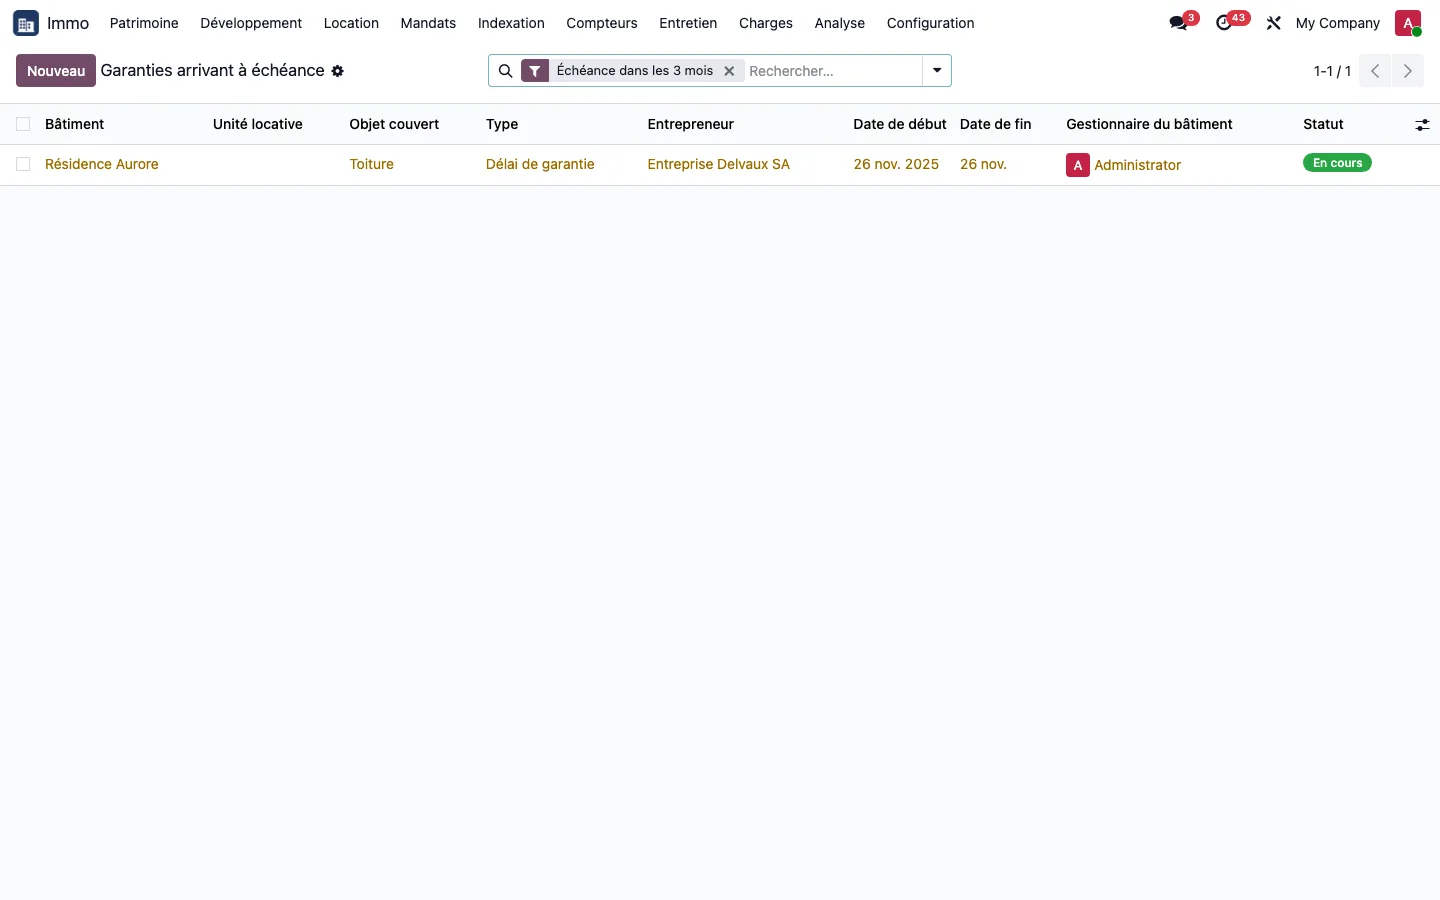
The Warranties expiring soon list shows those expiring within three months, with the building's property manager. A building without a property manager is not overlooked: it appears under a dedicated filter.
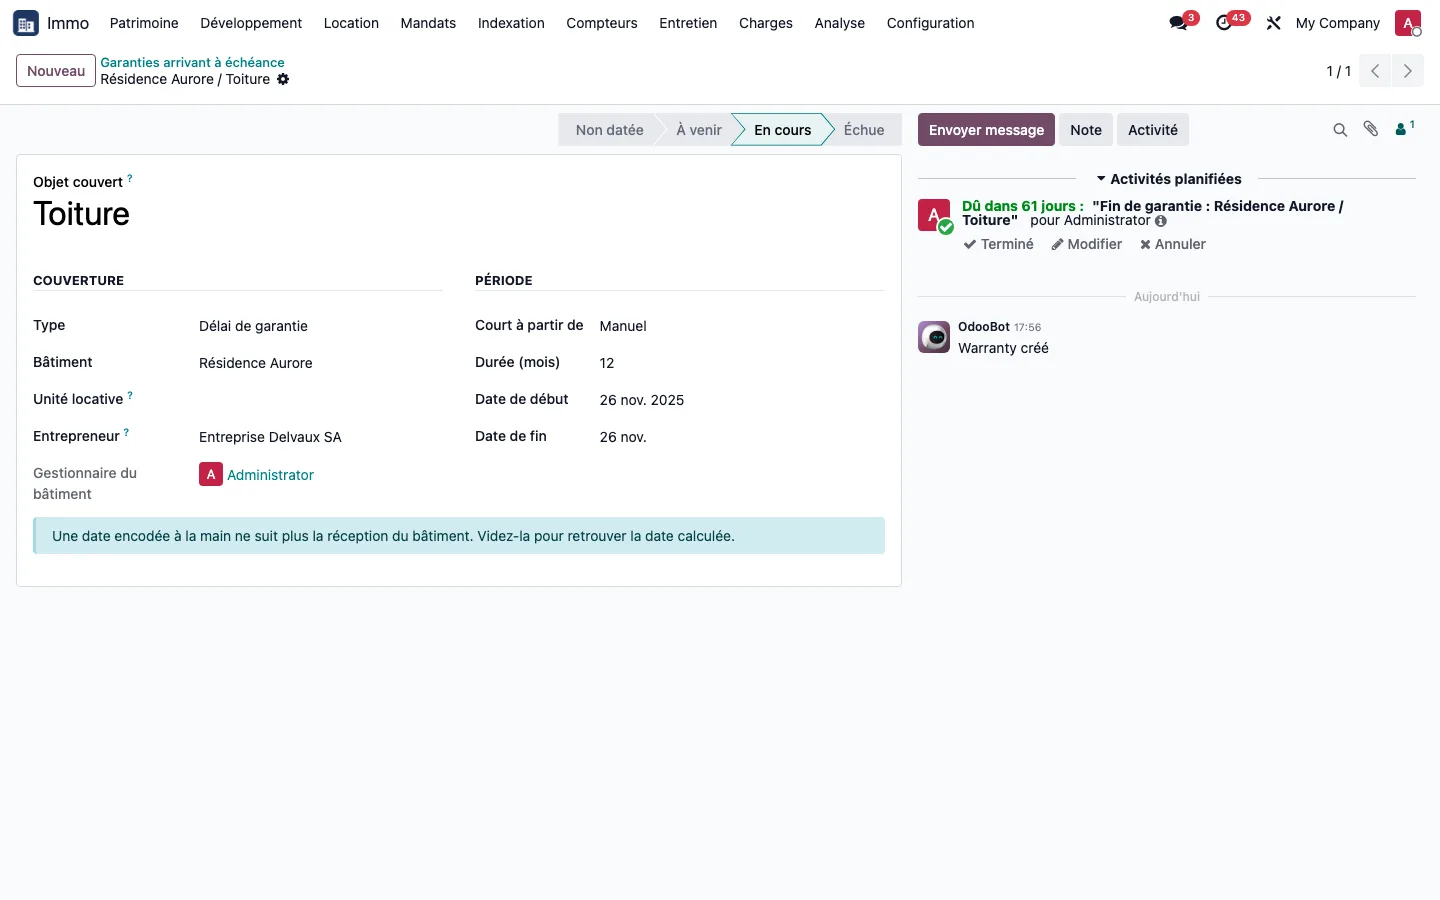
Every night, an activity is assigned to the building's property manager for each warranty that enters this window, once per warranty.
Step 12 · Open a building's document file
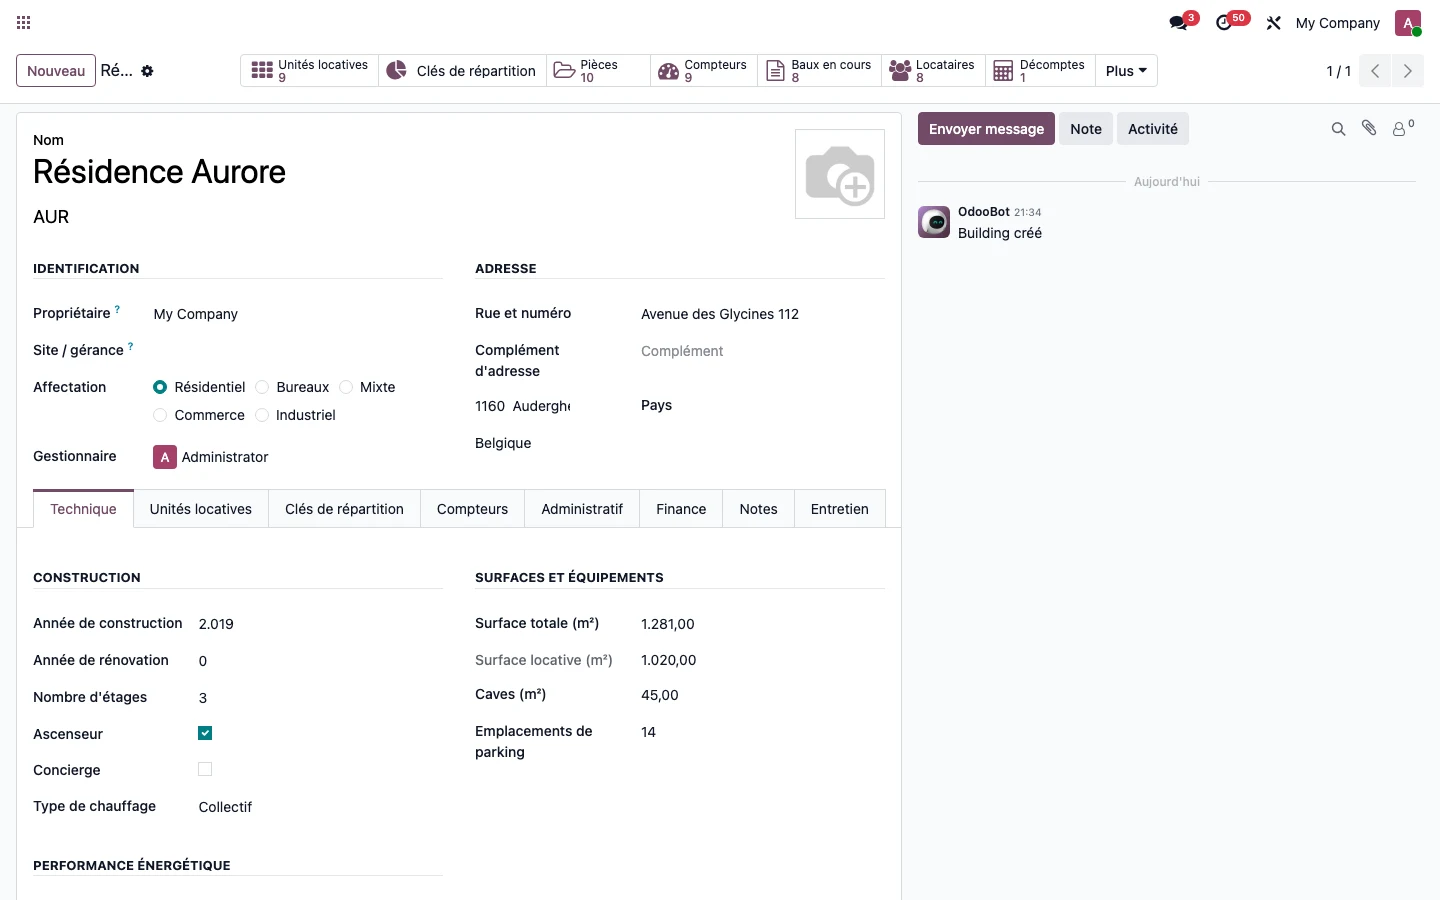
Open Immo > Portfolio > Buildings, then a building record. The Documents button, at the top of the record, counts the documents filed against the building, its units, its leases and its installations: 10 for Résidence Aurore.
Step 13 · Read the timeline
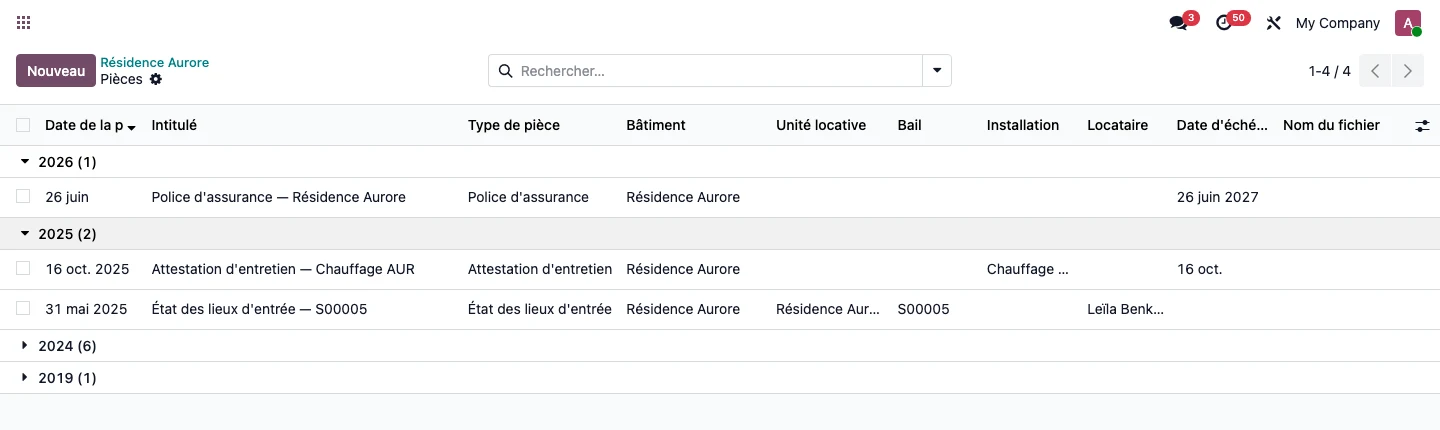
The button opens the building's list of documents, grouped by document year, most recent at the top: 2026 (1), 2025 (2), 2024 (6), 2019 (1). It shows the insurance policy valid until 26 June 2027, the heating maintenance certificate, filed against the building and the installation, and an entry inventory and condition report filed against its lease and its tenant. The New button in this list automatically files the document against the building.
Step 14 · File a document
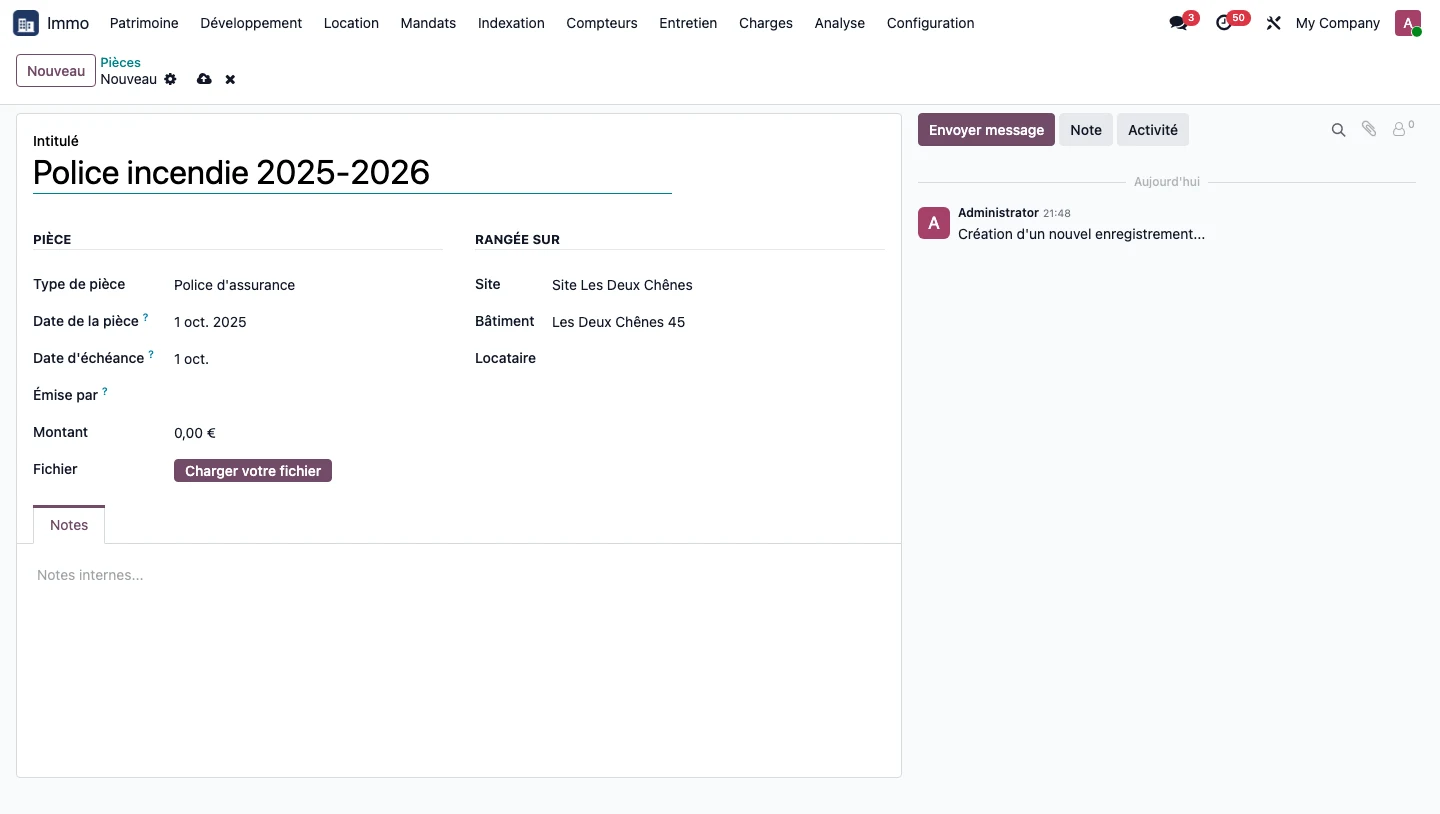
Open Immo > Portfolio > Documents, then New. Choose the type, then the date of the document: the expiry date is suggested from the validity of the type and follows the date when you correct it. An insurance policy signed on 1 October 2025 receives the expiry date of 1 October 2026. The site is filled in from the building; for a lease document, the building, the unit and the tenant are filled in from the lease. The owning company and the property management company are taken from the building.
Step 15 · Get notified before the expiry date
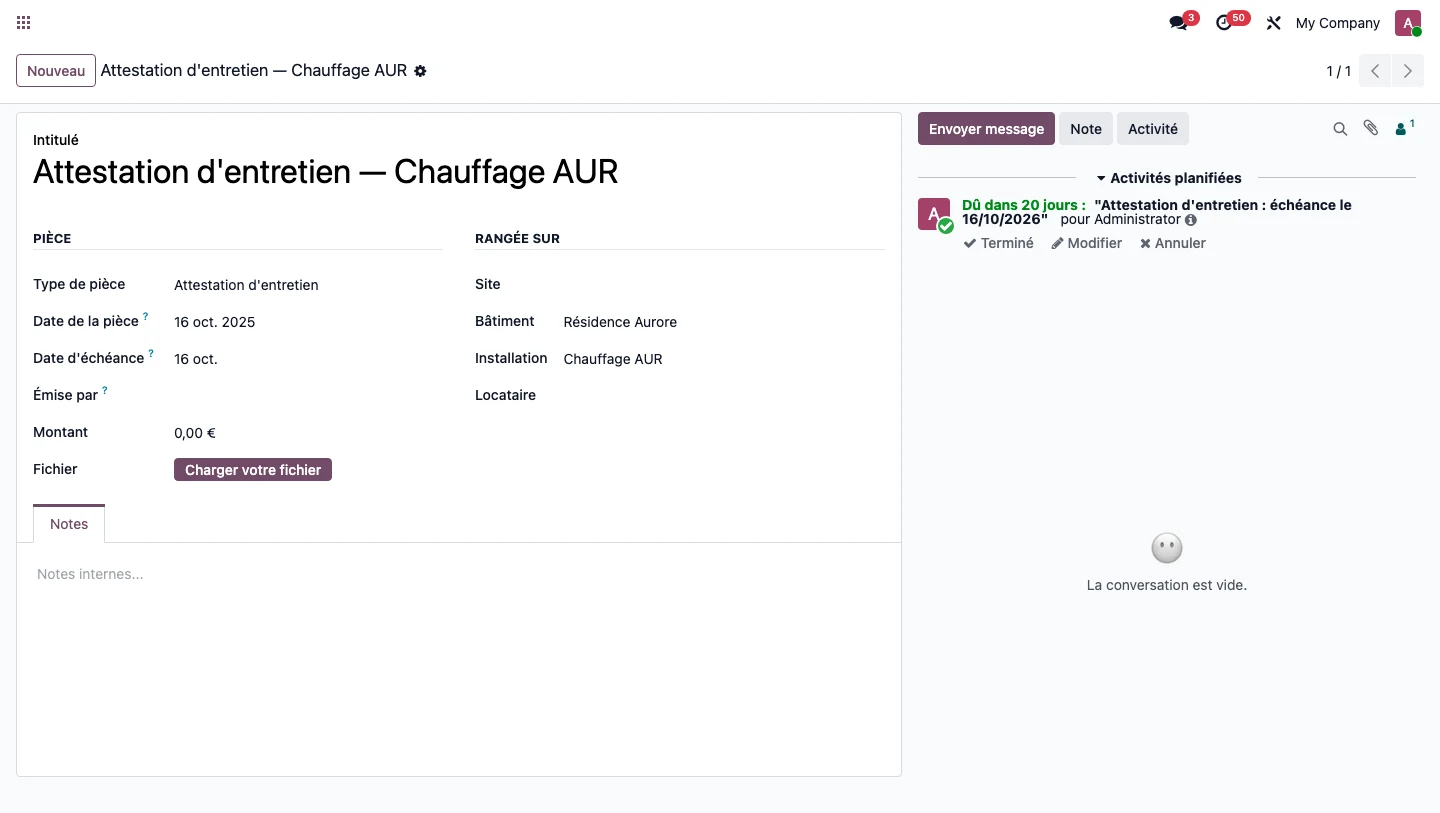
The heating maintenance certificate is dated 16 October 2025 and its type has twelve months' validity: the suggested expiry date is 16 October 2026. Thirty days before, the scheduled document expiry task assigns the building's property manager, in their language, an activity “Maintenance certificate: expires on 16/10/2026”. Marking the activity as done does not bring it back; postponing the expiry date deletes the old reminder and prepares a new one.
Step 16 · Check completeness
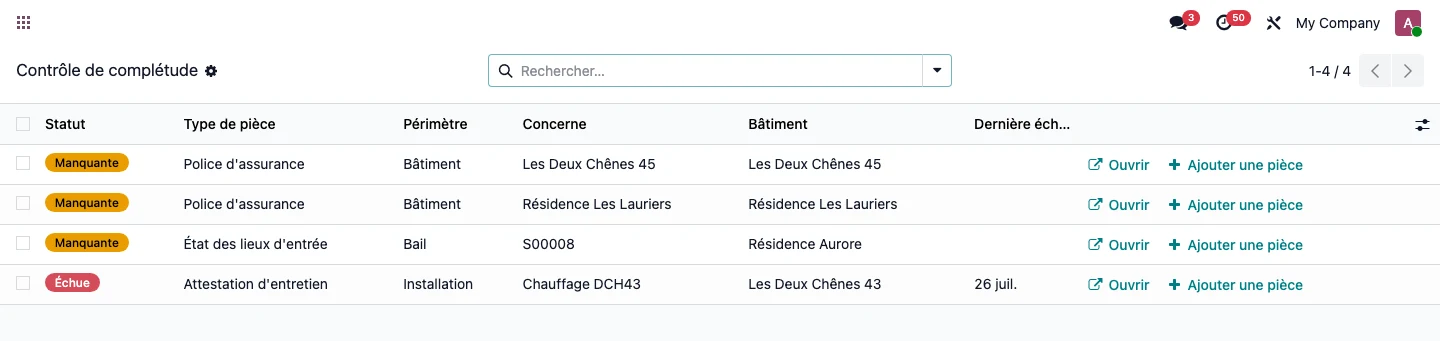
Open Immo > Portfolio > Completeness check. A single list, calculated on opening, for all types marked Mandatory: every building, current lease or installation that lacks its document (Missing status) or whose latest document has expired (Expired status, with its latest expiry date). Open takes you to the object concerned and Add a document opens a document already filed against it, with the right type. On the demonstration database, the list has four lines: two missing insurance policies across six buildings, a missing entry inventory and condition report across 35 current leases and an expired maintenance certificate across two heating systems.
Step 17 · Read a tenant's file
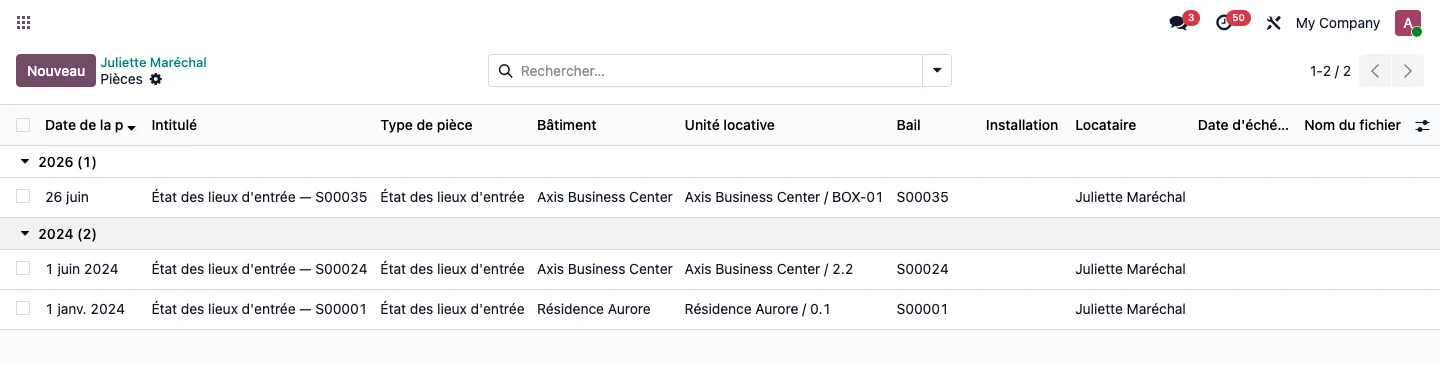
On a contact record, the Documents button opens their own timeline. In the demonstration, a tenant has three entry inventory and condition reports, one per lease, for three units in two buildings.
Step 18 · Configure the document types
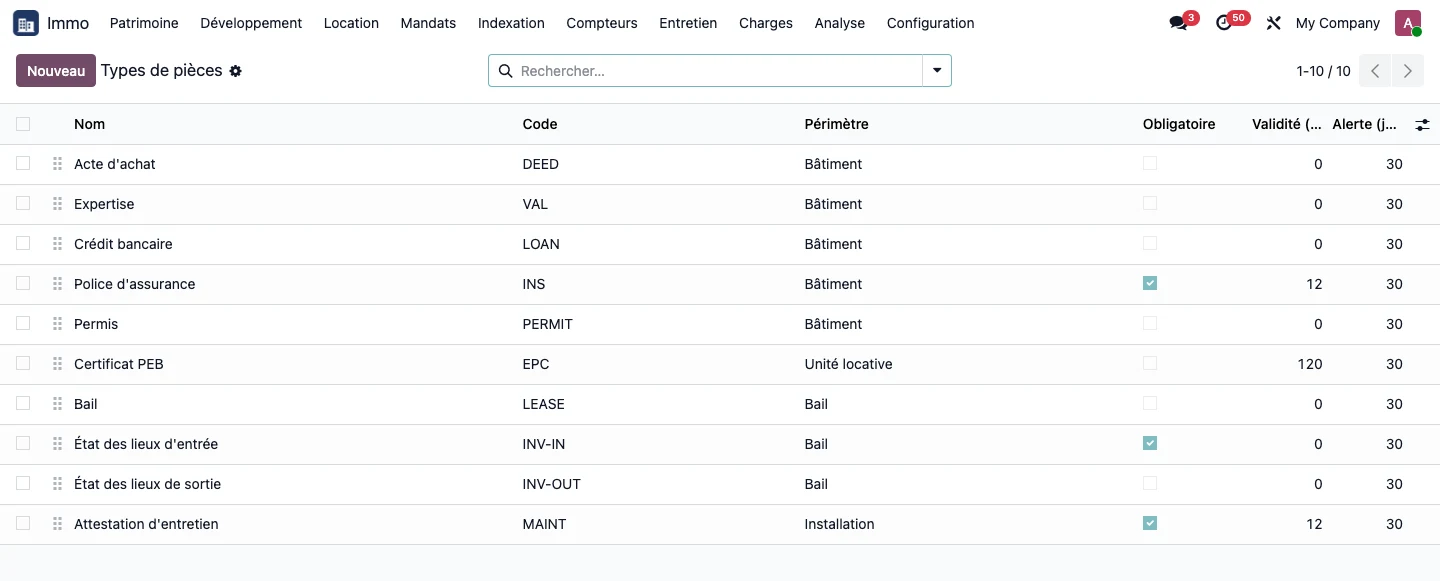
Open Immo > Configuration > Document types. Ten types are supplied: six on the building or unit, three on the lease, one on the installation. Each has its Scope, its Mandatory flag, its Validity in months (0: no expiry date suggested) and its Alert lead time in days. Insurance policy, entry inventory and condition report and maintenance certificate are mandatory in the starter set; the latter applies only to heating installations, through a filter that you can widen.
Key points
- A share is not overwritten: it is versioned.
- A key that is not fully allocated is not an error: it is the owner's share.
- A “metered consumption” key drives nothing by itself: the allocation follows the meter readings.
- A claim carries an insurer, a declaration, an expert assessment, an excess and a compensation payment: it is not a maintenance ticket.
- A listing can only be published if all the criteria required by the target channel are met.
- The set-up wizard creates the building and all its units in a single operation; an outdated preview blocks creation until it is refreshed.
- A more recent document of the same type silences the older one; an expired document remains visible, with the Expired status.
- The completeness check is calculated on opening, for the types marked mandatory only.